
PowerPoint has a lot of built-in features that help you edit images. Background removal is one such feature. This article teaches you how to remove a solid-coloured background in PowerPoint. Most of us use graphics on some level, whether it be to enhance a presentation or design images for team sites. Learn how to use PowerPoint as a background picture remover.

Table of Contents
How to Use a Background Picture Remover
- Paste your picture into a PowerPoint Slide, then click to select the picture.
- On the Format tab, select Remove Background.
- Use the sizing handles to adjust how much of the background to remove.
- Use the Background Removal tools to refine the selection and save the changes.
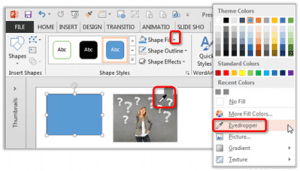
How to Add a New Background
- Insert a shape to use as a background for the image (on the Insert tab, select Shapes).
- Select the shape and on the Format tab, click the More button next to Shape Fill.
- Select the Eyedropper
- Click on the area of an image on the same slide to fill with that colour.
- Click on Shape Fill again and apply a gradient if desired.
Remember, you might need to use the Arrange button to bring an image forward or backward to get the appropriate layering. What to learn more? Find more Working Smarter Tools.